Frequently asked questions
Webpower is a web-based application which works in all webbrowsers, there is no need to download or install any software.
In our frequently asked questions you can find a number of articles on how you can work with our platform. In addition, we also explain why you should use certain features.
Getting started
If you copy and paste text from a (Word) document, the layout (font, colour, etc.) of the text is copied as well. This could result in your email being so large that it can no longer be sent.
This is why we recommend typing your texts directly in the drag & drop editor. Another option is to prepare texts in a Notepad file, as these applications don’t have any layout.
It goes without saying that no email marketer likes seeing people unsubscribe from their emails. However, hiding the unsubscribe link is a bad idea. Doing so leads to irritation among customers, and will ultimately damage your email deliverability. Make it easy for recipients to (temporarily) unsubscribe from your emails.
To set this up in Webpower, go to Content > System pages. There you can use the unsubscribe plugin to change a number of settings for opting out of your emails.
You can:
– turn on/off ‘temporary unsubscriptions’;
– give subscribers the option of changing information;
– set up the unsubscribe email;
– add reasons for unsubscribing.
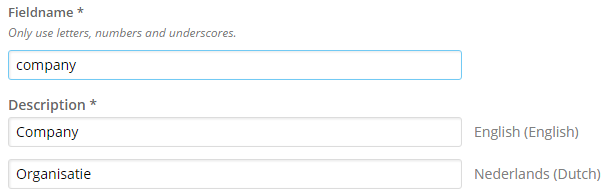
You can change almost all database fields. The only fields that cannot be changed are ‘email’ and, if available, ‘lang’.
To change these, go to setup and database fields. Select the field you want to change and click on change.
You can then change the field name, its description and the input types.
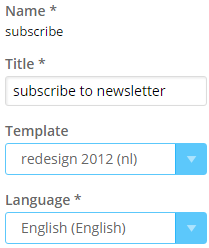
A confirmation page is a page you link to from a confirmation email, like the ‘subscribe_confirm’ mailing.
You can use the confirmation page after a confirmation email, e.g. if you are using a double opt-in.
After a new subscriber indicates that they actually want to receive your emails by clicking on a button in the confirmation email, you can forward these people to the confirmation page, which allows you to confirm that they will start receiving updates from you from now on.
You can use a system page as a registration page for your newsletter. Using a registration form, this information is then entered into Webpower.
System pages are landing pages, built into the Webpower platform. For example, the registration and deregistration page for your newsletter.
System pages are set up by default. You can change them, e.g. to change them to your corporate identity, by clicking on content and system pages. Here you can click on the desired system page, and then on change at the top of the menu. On this screen, you can change the title of the page, change the template and select the visible database fields, among other things.
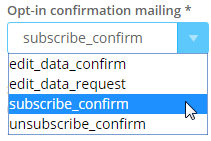
You can create a confirmation email by heading to content and selecting confirmation emails. Have you already created an email? Select the email and click on change HTML.
If you want to create a new email, select add and enter all information (name, template, language, subject line, sender name, sender address and reply address).
You can set up a confirmation email by going to content and system pages. When you change the subscribe plugin by clicking on change in the menu, you can select the right confirmation email.
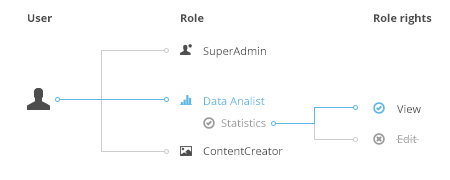
Every user of the Webpower platform has one or more roles. The role determines what a user does or doesn’t have access to.
Roles within Webpower
You can choose whether a user with a role can send a final email or not. In addition, you can define areas the user will have access to.
Areas the user won’t have access to will not be displayed for them. Examples include:
- Access to campaigns
- Access to user management
- Access to contacts
- Access to email templates
Two examples of roles:
1. Content creator
If your marketing team consists of several people, or if you are using external companies that design your emails, you may not want them to have access to all the information. Creating a “content creator” role may be a good idea.
For these users, all you need to do is select “mails” as the area the user has access to. All other menu items will be invisible to this role. When it comes to rights, you can also decide whether these users can create, edit or delete mails.
2. Data analyst
You can create a special role for data analysts. These users can see all statistics, but they cannot create or send mails, and they will not have access to your contacts.
Changing roles and rights
To change roles and rights, go to admin and select roles. To define a new role, copy the role called Superuser. To change a role, select the desired role and click on edit.
Give the new role a name and select the areas this person has access to. Please note: A user does not need to have access to the “Campaigns” part to work with campaigns. Access to “Campaigns” means that this role can create, change and delete campaigns.
To change the role rights, select role rights in the menu on the left. Select the desired role and specify whether this user can view and/or change information for each area.
In the Webpower platform, system groups are groups that are created automatically when a new campaign is created.
System groups include;
- subscribers
- unsubscribers
- hard bounce
- soft bounce
These groups cannot be deleted.
Emails in Webpower are created within a campaign. If you want to create a whole series of emails, you can create a new campaign.
You can create a new campaign in the Webpower platform by going to setup. Then simply select campaigns and insert.
Enter the following information:
Brand
What brand does your new campaign belong to? If your campaign is linked to an overarching brand, the subscriber can also unsubscribe from all campaigns belonging to this brand. For brandless campaigns, they can only unsubscribe from the current campaign.
Name
Name of the campaign.
Default from name
Sender name for all emails in this campaign: also used for emails of plugins.
Default sender address
Delivery address for all emails in this campaign: also used for emails of plugins.
You can choose a different sender address. You can add it under setup > sender addresses.
Default reply address.
The default reply-to address for all emails in this campaign.
Languages
Select the languages you want to work with in this campaign. Plugins will be created for the languages selected here.
Use overall list?
If you are using the overall list, you are bound to the fields of the overall database. Using a specific address list is recommended.
Deletable?
Check if the campaign may not be removed. [Remove] in the overview screen will not work if checked.
Use templates only?
Use this option if the use of templates in emails is required.
Weblink validity
How long (in days) will the web link be valid after receiving the mailing? Is the document meant for sending replies, or can it also be used for suggestions? In case of the latter, it may be useful to provide a ‘default’ suggestion or to enter something if you want the web link to be valid indefinitely.
Default plaintext message
The default plain text message for all emails in the campaign (can be changed for each email).
Default recipients
Here you can enter a number of email addresses that will receive every final mailing sent from this campaign. The data of subscriber ‘user@example.com’ is used for the personalisation of the messages. You can enter multiple addresses by separating them with a comma.
Conversion points
Enter the names of the conversion points that can be used. This name may only consist of letters, numbers and underscores. You can enter multiple conversion points by separating them with a comma.
Exclude list
Specify which exclude lists should be used for and applied to this campaign.
WebAnalytics
In addition to placing conversion pixels, you can also learn about clicking behaviour using Google Analytics. Enter your information here.
Twitter account
If you want to tweet about mailings sent from this campaign, you can log into your Twitter account here.
Forward bounces to
Enter the email address that bounces should be sent to.
Click on OK. The list with campaigns will appear.
The campaign has been created and is listed in the list box in the upper left of your screen.
- You can create a new brand in the Webpower platform by going to setup.
- Then simply select brands and insert.
- Enter the name of the brand and click OK.
The list with all of your brands will appear. The brand has been created and is listed in the list box in the upper left of your screen.
When asking Webpower a support question, we recommend including the campaign number right away. You can find this number in your browser’s address bar.
For example: https://demo.webpower.eu/admin/?campaign=7
If you know your campaign numbers by heart, all you need to do is Shift+click on the campaign name, enter the correct campaign number and – poof! – you’re in the right campaign.
When asking Webpower a support question, we recommend including the mailing number right away. In the top right on the cog, if you add the column id and click on show below, the mailing numbers will be displayed.
Webpower features an overall campaign. In addition, you can create separate campaigns that are ‘non-overall’.
Overall campaign
Overall campaigns are used primarily for setting up overarching databases. An overall campaign is an overarching one. The plugins (like subscribing and unsubscribing) can also be overarching.
With overall campaigns, a contact’s information is stored in a central location. These contacts can be contacted within the campaign they subscribed to.
Non-overall campaign
The non-overall campaign uses a database that is only specific for the campaign.
Contacts & Segmentation
If your import looks like this:
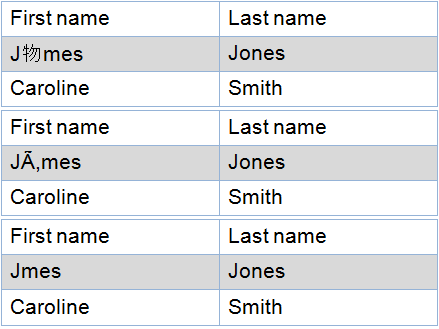
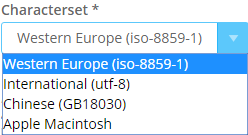
You’ve probably selected the wrong character set. When you are about to upload a CSV file, you need to make sure the character set chosen in the Webpower upload screen matches the character set in your CSV file.
Go to statistics and select subscriber development. The top graph shows how many contacts are in your database. The lower graph shows the net subscriber count you gained or lost in a given week (subscribers – unsubscribers = value in the graph).
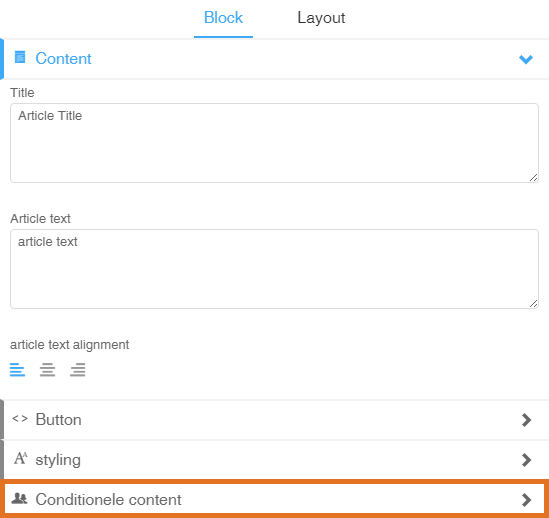
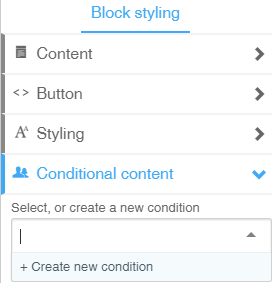
Using Webpower’s drag & drop editor you can create conditional content. Conditional content helps you to better tailor your emails to the recipients. Conditional Content is available under the Block tab.
When you’re working in the drag & drop editor, you can specify for each individual block which criteria the recipient has to meet for the block to be displayed to them. You can create a new filter or select an existing one.
Example
Want a block to only be displayed if the recipient is a woman? Simply specify that the recipient’s gender has to be equal to ‘female’:
You can personalize an email by adding a value from your database, like a first name or a title. If you want to personalize your email, follow the steps outlined below:
In the Webpower block editor, or in an HTML email and in the subject line:
- Go to Setup > Database Fields and look at the possible values you can use to personalise an email. In the table, you will see field name and description. Once you have determined the value you want to use, like the first name, copy the field name of this value.
- Paste the copied field name after {$ and close with }. For example: {$firstname}. You can use this code anywhere in your email in order to use the recipient’s first name. When sending the email, Webpower will replace {$firstname} with the first name of the recipient.
In the drag & drop editor:
- Go to Setup > Database Fields and look at the possible values you can use to personalise an email. In the table, you will see field name and description. Once you have determined the value you want to use, like the first name, copy the field name of this value.
- Paste the copied field name after {{contact. and close with }}. For example: {{contact.firstname}}. You can use this code anywhere in your email in order to use the recipient’s first name. When sending the email, Webpower will replace {{contact.firstname}} with the first name of the recipient.
Within Webpower, groups are used to segment the entire database of contacts. This allows you to better tailor your email campaigns to the specific contact and make it as personal as possible. The better you are able to personalise an email, the greater the chance that your email is opened and perceived as relevant. This user tip explains why and how you can use a temporary group.
Temporary group
In some situations you want to create a temporary group, for example, to send them an email once. Once the email has been sent, you can delete the group. This means that only the group no longer exists, but the contact details remain and statistics are unaffected.
An alternative is to create a temporary group that is automatically deleted after 24 hours. If you add tmp_ in front of the group, for example tmp_import01122015, it is automatically deleted from Webpower. This way you keep track of the list of groups in your database.
Content Creation
Magic hidden are database fields that you can use dynamically within the email.
You can use the list below to add to your database (via Setup -> Database Fields):
bold = reserved. These names you cannot create but are created automatically
| Fieldname | Function |
|---|---|
| id | RecipientID, each contact record has their unique user ID |
| create_date | The date the user is created in the database |
| the email address of the user | |
| mobile_nr | in campaigns with SMS-sender this field gets added automatically. |
| format | If you use the option of the plaintext of HTML. |
| DMDcreate_date | create_date in some exports |
| DMDmember_since | the date that the user gets connected to the group you export. |
| sender_name | when you use this field this will replace the sender name |
| sender_email | when you use this field this will replace the sender email |
| reply_name | when you use this field this will replace the sender-reply-name |
| reply_email | when you use this field this will replace the sender-reply-email |
| last_mail_date | the date that the last mailing is sent |
| last_open_date | last date the email is opened |
| last_click_date | last date the email is clicked |
| dmd_last_remote_addr | the IP-address of the contact where the open/click/conversion has been |
| dmd_last_browser | the browser of the last open/click/conversion has been |
| dmd_last_browser_version | Version number of the browser |
| dmd_last_os | operation system |
| dmd_last_click_date | See last_click_date |
| dmd_last_click_name | title of the last link that is been clicked on |
| dmd_last_open_date | see last_open_date |
| dmd_last_geo_country | If you use the GEOMODULE: the country where the IP-address is |
| dmd_last_geo_region | If you use the GEOMODULE: the region where the IP-address is |
| dmd_last_geo_city | If you use the GEOMODULE: the city where the IP-address is |
| dmd_last_geo_lat | If you use the GEOMODULE: the geo-lat where the IP-address is |
| dmd_last_geo_long | If you use the GEOMODULE: the geo-long where the IP-address is |
| dmd* | Only SU-accounts can add these database fields |
The following fonts can be used within Webpower:
Arial, Helvetica, sans-serif
‘Arial Black’, Gadget, sans-serif
‘Bookman Old Style’, serif
‘Comic Sans MS’, cursive
Courier, monospace
‘Courier New’, Courier, monospace
Garamond, serif
Georgia, serif
Impact, Charcoal, sans-serif
‘Lucida Console’, Monaco, monospace
‘Lucida Sans Unicode’, ‘Lucida Grande’, sans-serif
‘MS Sans Serif’, Geneva, sans-serif;
font-family: ‘MS Serif’, ‘New York’, sans-serif;
‘Palatino Linotype’, ‘Book Antiqua’, Palatino, serif;
Symbol, sans-serif
Tahoma, Geneva, sans-serif
‘Times New Roman’, Times, serif
‘Trebuchet MS’, Helvetica, sans-serif
Verdana, Geneva, sans-serif
Webdings, sans-serif
Wingdings, ‘Zapf Dingbats’, sans-serif
These fonts are used in Webpower because this are the fonts that are supported in the most used email clients. It is possible to diverge from those fonts, in the HTML-code of a custom template. In the HTML-code there will also be a fall back font included. This is used when the diverged font is not supported in an email client.
Variables can be used to personalise content. For example, you can use the field ‘first name’ to personalise a subject. The ‘gender’ field could be used to determine whether a selected part of the email can only be shown to men or women.
You can personalise content based on all database fields in your database. Under admin > database fields you will find all of the database fields available to subscribers.
Variables can be used to personalise mailings. For example, you can use the field ‘first name’ to personalise a subject. The ‘gender’ field could be used to determine whether a selected part of the email can only be shown to men or women.
You can personalise content based on all database fields in your database. Under control > database fields you will find all of the database fields available to subscribers.
Select set up > sender addresses. By default, it is only possible to use the license localdomain. This means you can only choose what appears before the @ sign (e.g.: senderaddress@localdomain.com).
You can also use your own localdomain, which allows you to specify what appears after the @ sign. This feature must be requested from Webpower.

Most emails contain one or more calls-to-action. You want people to do something once they receive an email. This is why you may want to add links to your mail, because it makes it easier for your recipient to visit your website, to order a product, or to download a whitepaper.
Links in your email also enable you to measure the conversion of your email. This allows you to analyse how many times a link was clicked. You can use this information to make your next email even better. If you give every link a unique title, you can measure every link separately.
Personalisation is becoming increasingly important. This is not about a name in the introduction, but about actual personalised content. Webpower is perfectly suited for creating such content.
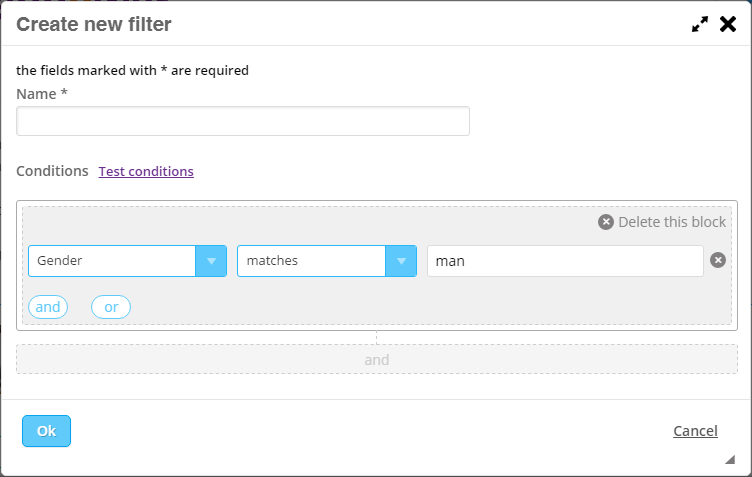
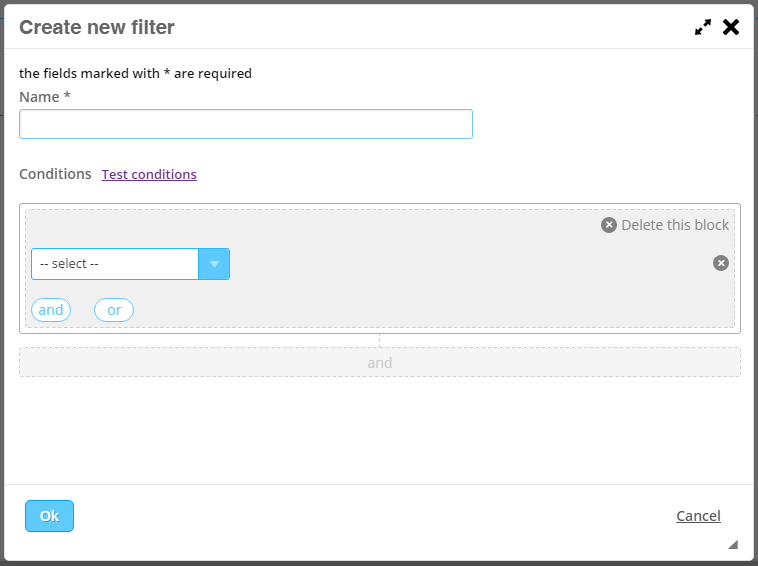
When formatting an email, you can specify a condition for each block which determines which of your recipients will end up seeing this block or not. Click on the block you wish to add the condition to, and select the option Conditional content. Here you can either select a condition you’ve created previously, or create a new one.
Choose the database field the filter has to check for, as well as the corresponding conditions (equals, does not equal, starts with, etc.).
By clicking on ‘test conditions’, you can see how many subscribers in your database meet the criteria of this filter.
Depending on the conditions you create, some recipients could end up receiving extremely long emails. If your condition is male or female, it is easy to see what people will receive. But if your condition is based on what colour someone likes, it will be virtually impossible to create a proper email for every colour and combination. So in this case, it would be best to create two general blocks without a condition, and one or two blocks with a condition. That way everyone will receive a proper, full-fledged email.
The term RSS stands for Really Simple Syndication. It allows you to easily remain up to date on news on your favourite websites. You can use RSS in Webpower to re-use content quickly and easily.
In that case, we will create an RSS block for you, which uses an RSS URL to retrieve the information and automatically fills blocks. Naturally, you can edit the content afterwards.
By default, no RSS block is available in the Drag & Drop editor. If you would like to include one, please contact your project manager, or call +3185 773 99 90.
Please note: this feature is only available if you also have the RSS module.
When you create a new mailing, enter an RSS URL under the advanced tab. When you click on OK, you will see an RSS icon next to your email.
![]()
You can now add an RSS feed to your email. We’ve included a sample RSS code you could use in your email below:
// Print RSS title:
print 'Title: ' . $RSS['title'] . '
';
// Print RSS description:
print 'Description: ' . $RSS['description'] . '
';
// Loop through all items in the RSS feed:
foreach($RSS['item'] as $item) {
36
print '
';
// Print item hyperlink, make it traceable (via the title
attribute):
print '';
print $item['title'];
print '
';
// Print item description:
print $item['description']; print '
'; // Print separator between items: print '
'; }
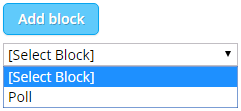
Add a poll in order to quickly get opinions and information from your customers. Go to content and select polls on the left.
You can create a poll by entering a question and up to five possible answers to go with the question. The email configurator will then show a block named poll, where you can select a poll from the ones created.
Select send and then select filters. Here you can create a new filter.
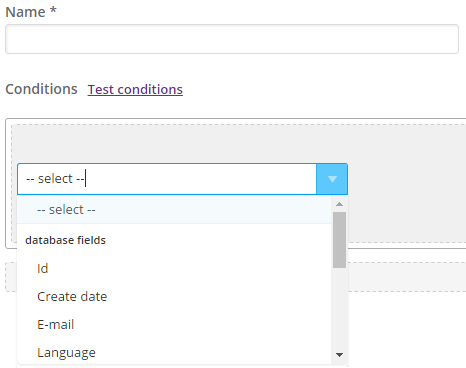
Choose the database field the filter has to check for, as well as the corresponding conditions (matches, does not match, starts with, etc.).
By clicking on test conditions, you can see how many subscribers in your database meet the criteria of this filter.
Option 1: in the email
Select the block you want to apply a filter to.
At the bottom right, select conditional content and choose the filter that applies to this particular block. If the right filter isn’t listed yet, select + Create new condition.

Choose the database field the filter has to check for, as well as the corresponding conditions (matches, does not match, starts with, etc.).
By clicking on test conditions, you can see how many subscribers in your database meet the criteria of this filter.
Option 2: in the filter overview
Select send and then select filters. Here you can create a new filter.
Choose the database field the filter has to check for, as well as the corresponding conditions (matches, does not match, starts with, etc.).
By clicking on test conditions, you can see how many subscribers in your database meet the criteria of this filter.
In your email you can then select the block you want to apply a filter to.

At the bottom right, select conditional content and choose the filter that applies to this particular block.
A dynamic filter is a filter that can be applied to birthday emails, to give an example. This filter determines whether the current date matches the birthday of a subscriber, and will send a birthday email if that is the case.
A dynamic filter can also be used to present conditional content to subscribers. A certain text block in your email will only be displayed to subscribers who meet the filter criteria (e.g. men only).
We recommend keeping the size of your emails without any images below 100 Kb. Images included, 250 Kb is a good benchmark.
But how can you know how big your email is exactly? The answer lies in the email analysis developed by Webpower. Select your email and click on ‘checks’.

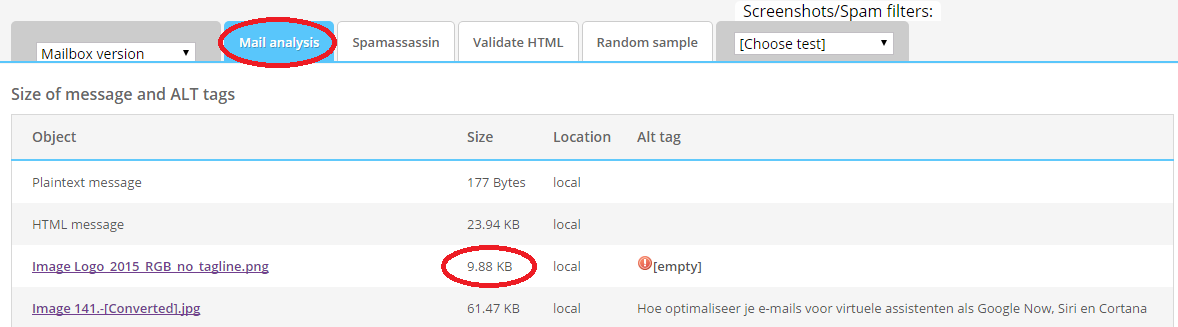
The maximum width of your emails and, by extension, your images is 600 pixels.
If you want an image to be narrower, 250 pixels wide for example, it is best to resize it to actually be 250 pixels wide. This reduces the file size, load time and your recipient’s data usage.
If you use Photoshop, always save your image using the ‘save for web’ option. This removes and superfluous information, reducing your file size significantly. You will see a preview of the file before you save it, so you always know what your editing does for your final image.
If you don’t have Photoshop, you can use free online tools like Kraken.io, Tinypng, PicMonkey or Aviary.
One way to actively experiment with ways to get the best results is an A/B test. You send a particular version of your email (Version A) to 5 to 25 percent of your contacts, and you send Version B to the same number of contacts. Afterwards, we analyse the results, and Webpower will automatically send the most successful version to all the other addresses.
You can perform multivariate tests in Webpower with 2 to 4 versions of your email. This might sound complicated and time-consuming, but Webpower allows you to complete an A/B test in 5 steps:
Step 1
Create 2 or more variants of your email, using different sender names, content (text, call-to-action), subject lines or times at which you send the message, for instance.
Step 2
Go to Send in the menu and select the tab A/B test.
Step 3
Create a recognisable name for the A/B test.
Step 4
Choose the variants of the email you would like to use.
Step 5
Determine within which group(s) you want to send the A/B test.
Step 6
Determine the size of the test groups using the slider.
Step 7
Select the winning criterion.
Step 8
Determine when the best variant is sent to the other addressees.
Step 9
Check all the information for accuracy and send the email. You can view the results in the Statistics overview. In the menu to the left, you will find specific numbers regarding the A/B test.
Send & Share
Select the desired email in the content overview. Click on tools, select checks and then select the option random sample.
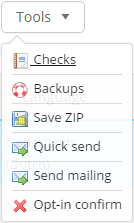
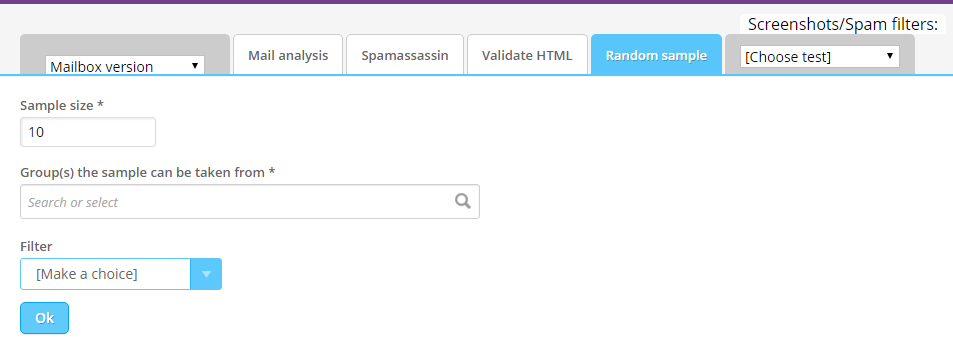
In this menu, you can choose which group to perform the test on, and what filters you want to use. The personalised emails will then be generated. This gives you a good idea of whether your email is working as intended for all of your contacts.
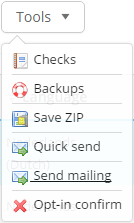
- Select the email you want to send. Under tools, choose send mailing.
- Under kind of delivery, select definitively.
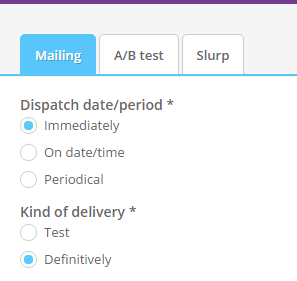
- Under subscriber groups, select the groups you want to send the email to.
Enter all information and click on OK at the bottom of the page.
On the following page you will once again see all the choices you just made.
Make sure to check your choices one more time, then click on OK at the bottom of the page.
Your mailing has been sent.
Always check your email before sending it. Even if you are using the same templates, and even if you’ve already gone through the text. An update of an email client (Gmail, Outlook, etc.) could mean that your email no longer looks good. Additionally, going through the text one more time is recommended. For example, if you’ve been working in the same email as someone else, the system will only remember the last-saved version, which means your edits may not have been saved.
- Select the email you want to send. Under tools, choose send mailing.
- Under kind of delivery, choose test.

You also have the option to select the screenshots you would like to test (this is a premium feature).
Under subscriber groups, select the groups you want to send the email to.
For test mailings, you can only select test groups.
So it’s impossible to accidentally send your email to your entire subscriber base. - Enter all information and click on OK at the bottom of the page. On the following page, you will once again see all the choices you just made.
Make sure to check your choices one more time, then click on OK at the bottom of the page.
Your test email has been sent.
Click on the blue check mark. The text will be struck through in red, and the task has been disabled.

Under the menu send, go to triggers. Next, click on add and enter a name for your trigger. Make sure you also select the mailing you want the trigger to apply to.
You will see two options: Define condition(s) and Define action(s).
Under Define condition(s), select the condition the trigger has to meet. For example, an open or a click inside the email.
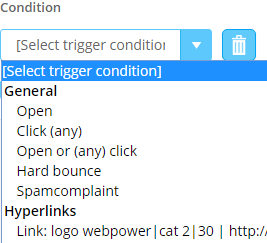
After selecting the condition, you can choose from four different actions under Define action(s):
Send mailing: here you can choose a mailing that will be sent to the subscriber who met the trigger condition.
Add subscriber to group: Here you can select a group the subscriber will be added to after they meet the trigger condition.
Callback URL: Here you can create a callback to, for example, a website that will then also have the variables included.
Update subscriber field: Here you can update a subscriber field. You can also add and subtract here, like an interest field that goes up by +1 each time. Let’s say someone has an interest level of 2. After they meet the trigger conditions, this number will increase to 3.

You’re almost done now. All you need to do is enter the trigger lifespan and trigger delay. Under duration, select the maximum number of triggers that can take place, as well as the time until which it can remain active. Under delay, you can specify a delay if you so choose.
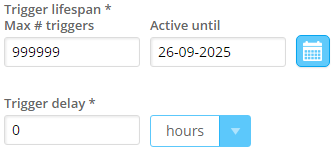
Next, click on OK. The trigger will become active the next time you send this email. Each trigger set on an email will only be executed once per contact person.
When you copy a mailing, the triggers will also be included. This is useful if you want to use the same triggers for future mailings.
After creating an email, you have the option of ‘quick sending’ it. This allows you to see a preview of the email to determine whether it’s the way you want it, without having to go through all the steps of the regular sending process.
The email will be sent to 1 or more addresses (email addresses need to be separated with a comma). You can find the quick send option under Content > Emails > selecting the email > Tools > Quick Send.
Please note: The plugins only work if the email address you want to send the email to has been added as a subscriber.
When sending an email, you can select one or more groups that you don’t want to send it to. If there is any overlap between the distribution list and contacts not on that list, not being in a distribution list will take precedence. In addition, fixed system groups (unsubscribers/hard bounce/soft bounce/spam complaints and people on the exclude list) will not receive any emails.
For example: the distribution list contains 1,000 contacts. The ‘non-distribution list’ includes 500 contacts. If, in the first file, 300 contacts match the ones in the second (don’t send to) file, the email will be sent to 700 contacts on the distribution list and the other 300 that overlap with the ‘non-distribution list’ will be excluded.
If there are also 100 contacts from the system groups among the 1,000 contacts, and if there isn’t any overlap between the distribution and ‘non-distribution’ lists, the email will be sent to 900 contacts from the distribution list, and the 100 contacts from the system groups will be excluded.
The same principle applies when using filters and languages: excluding contacts always takes precedence.
When sending an email, you may receive a notification that images cannot be found. For example:
“Mailing Last mail contains link(s) to images or other files that cannot be found. dmdelivery cannot send this mailing until these link(s) have been fixed.”
or
“Mailing Last mail contains link(s) to images or other files that cannot be found. The link(s) must be repaired for dmdelivery to be able to send the mailing.”
Email analysis
Go to content, then go to emails. Click on check and you will see the tabs email analysis.
Under ‘email analysis’ you will see the image’s file size is 0 kb. The most likely cause is the use of special characters in the image’s file name. If you change these characters to normal ones, the images should be found. Is the image’s file size still 0 kb even with proper character use? Try reuploading the image.
Special characters in the image’s file name
Make sure the file name doesn’t contain any spaces or special characters, like !@+#$%^&*()][ ) as they prevent Webpower from seeing the file’s location. Use _ (underscores) instead of spaces:
Reports & Results
One of the checks offered by Webpower is the scam link check. This check shows which links, if any, are incorrect. To solve the problem, simply open the email in question and edit the hyperlink.
• The URL must start with http(s)://
• The (link) text (which can be seen in the email) may not contain .nl or .com.
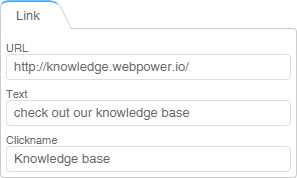
If there is a scam link in your email, you are displaying a different link in the URL than the page the link actually directs to.
For example, your link might say google.com as readable text, but the link actually directs to knowledge.webpower.io/en.
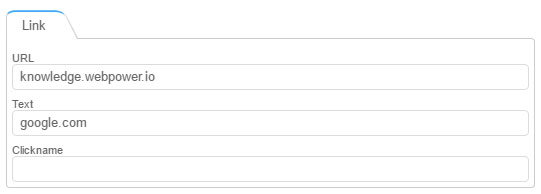
As a result, your email is highly likely to be marked as spam, meaning you will no longer reach the inbox of your contacts anymore. Not only is this a problem for your message’s reach, but you may end up on a spam blacklist as a result.
In the Webpower platform, system groups are groups that are created automatically when a new campaign is created. These groups cannot be deleted. They include groups like subscribers, unsubscribed, hard bounce and soft bounce.
When you send an email to the subscriber group, the subscribers in both the subscribe and unsubscribe groups are excluded. The unsubscribe group, hard bounces and soft bounces are the determining factors.

 (-1 rating, 1 votes)