How to setup & build your contact list?
Why would you go to the trouble of building your database if you can just rent or purchase an email list?
The really simple answer? If you don’t have permission to email someone, you shouldn’t email them. It might get you labelled as a spammer and if you get too many spam complaints, your ESP might flag you as a spammer, which will get you blocked. In addition, sending SPAM might actually get you a fine.
Getting permission via double opt-in
If someone says: “Yes, I want to receive information from you”, that’s when they are giving you permission. No pre-ticked boxes, not hidden in the terms and conditions. You are also allowed to email your customers.
Congratulations, someone signs up for your newsletter! This is where you can start the opt-in process. Now there are choices to be made. Are you going with a single or double opt-in?
The easier that process, the fewer people will pull out during registration and thus the higher the number of email addresses that end up in your database. This advocates a single opt-in: leave your email address here. However, you need to ask yourself: is my objective to collect as many email addresses as possible, irrespective of how well they will respond to my offers at a later stage? Or will I send an email newsletter aimed at increasing my sales, thus wanting to maximise the response?
Are you going with a single or double opt-in?
Assuming you decide on the second objective, it is always useful to opt for a double opt-in. That means that the person subscribing to a newsletter receives an email with a confirmation link. The person will only be registered for the newsletter once this link has been clicked. This way you prevent your database from becoming polluted with non-existent email addresses and you can be sure that the email address entered belongs to the person who subscribes. Just to be clear, we advocate a double opt-in.
Other reasons to choose double opt-in:
- Research shows that the number of opens and clicks from people who register through double opt-in was way higher than from people who register through single opt-in!
- Obviously, the number of bounces for a double opt-in is significantly lower than for a single opt-in. After all, it has been checked if people made a typo in their email address.
- The number of unsubscribers is also lower for a double opt-in. Because people are given some time to think about whether they really do want to subscribe to the newsletter, they are more motivated and then tend to unsubscribe less quickly.
All the more reason, therefore, to go for the double opt-in, even though there will be some people that will leave during the registration process.
Frequently asked questions
How to setup & build your contact list?
It is possible to add default recipients to a campaign. These recipients will receive every mailing that has been definitively sent from within this campaign, without these recipients having to be in the sending list.
Perfect for keeping colleagues up to date on sent mailings!
How?
Go to setup and select campaigns. Select the campaign you want to add default recipients to by clicking it once, then click on edit.
Scroll down until you see default recipients. Enter one or more email addresses. Multiple recipients need to be separated by a comma.

When you are finished adding email addresses, click on OK at the bottom of the page.
In the upper left, select the overall campaign.

Under setup > database fields, you will find all database fields that are available. In the upper right, you can click insert in order to add additional fields.
This is a mail being sent as confirmation, for example the “subscribe_confirm” mailing.

When you use a double opt-in, this is the email subscribers use to confirm that they really do want to subscribe. By clicking on the confirmation link, these subscribers will be moved from the opt-in group to the subscriber group.
Do you work with a subscribe plugin (or another subscribe method within Webpower), via the opt-in procedure? Then you work with confirmation emails. But how do I adjust these emails? We will explain that in this article.
Confirmation emails are created as HTML emails, unless Webpower has created a template. The layout of these emails can be changed under the menu content > confirmation emails. Be aware: there will be automatically created a confirmation email on all available languages. De most common used confirmation emails are the subribe_confirm and the unsubscribe_confirm. These emails automatically have a link in the email that will handle the subscribe process. If someone subscribes via a form, the contact will receive the subscribe_confirm mail in the inbox. If the contact clicks on the link, the subscription is succesfully closed.
It is a possibility to style the confirmation emails in the style of your website or email template. You contact support@webpower.nl for this question.
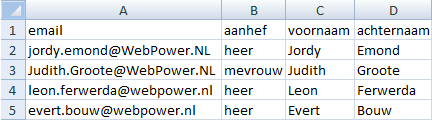
When compiling a CSV file, the first line is generally used to the title of the column in question. If a column’s title matches the name of a database field, the Webpower platform will recognise it automatically.
After all of the information in the file is complete, save it as a CSV (Comma delimited) file.
Working on a Mac?
CSV files created in Numbers cannot be imported. When you reopen the file in Microsoft Excel and resave it, you can import the file in the Webpower platform.
There are two ways of adding contacts in the Webpower platform. You can add them manually by entering the information of the person in question, or you can import a CSV file.
Manual entry
You can manually add new contacts in the contact overview (Contacts > Contacts) by clicking on add in the upper left corner. In this overview, the fields marked with an * (like the ‘email’ field) are required. At the bottom, you can select the group this person should be added to. Next, click on OK to save, or click OK & add more’ to save and add another contact immediately.
Importing contacts
Whenever you want to add multiple contacts, being able to add them all at once is most convenient. The Webpower platform allows you to upload a CSV file.
Under the Contacts header, select the upload contacts option. You can drag a CSV file here or look up a file yourself by clicking on browse.

You will then see a number of additional options:
Group: Here you can select which groups the subscribers should be included in.
Field separator: Here you can select how the fields in the CSV file are separated. A semicolon (;) is used by default (if your file is saved in CSV (Comma delimited), semicolons are used as separators as well.)
Match fields: Here you can match the fields in your CSV file with the fields in your database. Be aware: first, you have to create the database fields you want to match. Go to Setup > Database fields and insert a new database field. If they match, they will be imported into the right database field automatically. If this is not the case, it will say ‘[Skip]’, and the field will not be included automatically. You can still import this field by clicking on ‘[Skip]’ and then selecting the right database field.
Recipient of the results: once the file has finished importing, you will receive a confirmation with the results of the import on this email address. This message also contains additional information about any duplicates and errors.
What to do with duplicates: Duplicate information can be imported or ignored. You have the following options:
• Skip, preserve all existing data.
• Complement, preserve existing (non-empty) data. Only overwrite empty fields.
• Replace all existing data, including empty CSV fields.
• Replace existing data, except empty CSV fields.
After all the information has been entered, click on OK below the form. The CSV file will be imported in the background. After completion, you will receive an email at the address you entered earlier under recipient of the results.

Working on a Mac?
CSV files created in Numbers cannot be imported. When you reopen the file in Microsoft Excel and resave it, you can import the file in the Webpower platform.
If you are using a multi-language campaign, you are required to specify a language for all contacts. This field is called lang in the database.
For example, if you’re creating an English-language email, all English-speaking subscribers will receive this email once you send it, thanks to the lang field.
Lang is also used for system pages. All system pages will be automatically displayed in the right language for the recipient.
Under setup > database fields, you will find all database fields that are available. In the upper right, you can click add in order to add additional fields.
Take a look at this tutorial, which shows how to add a database field.

In the tutorial, the number of possible languages is limited by adding an input type. With a ”radio” input type, you can choose which database values should be possible to fill in.
The available database fields differ per campaign. Under setup > database fields, you will find all of the database fields available to subscribers. The email field is available by default. If you are creating a multi-language campaign, the field lang will be available as well.
Within Webpower, groups are used to segment the entire database of contacts. This allows you to better tailor your email campaigns to the specific contact and make it as personal as possible. The better you are able to personalise an email, the greater the chance that your email is opened and perceived as relevant. This user tip explains why and how you can use a temporary group.
Temporary group
In some situations you want to create a temporary group, for example, to send them an email once. Once the email has been sent, you can delete the group. This means that only the group no longer exists, but the contact details remain and statistics are unaffected.
An alternative is to create a temporary group that is automatically deleted after 24 hours. If you add tmp_ in front of the group, for example tmp_import01122015, it is automatically deleted from Webpower. This way you keep track of the list of groups in your database.

 (No Ratings Yet)